Wednesday, March 16, 2022

Flying Geese - PQ 13.6

It's hard to believe that this is the last challenge for Project Quilting 13.  The time has just seemed to fly by, which is maybe why Trisha chose Flying Geese as the theme for the final challenge?

I laughed a little when I saw the topic for the challenge, because my entry for the first challenge consisted of bright flying geese blocks made into a potholder.  I honestly considered making a matching one for this challenge, because ... matching potholders, right? But I ultimately decided against that idea.

I have several patterns that use flying geese, and a couple of them are for baby quilts.  I always like to make baby quilts to have on hand to gift to new mothers.  But unfortunately, I knew that this was going to be another short week for getting the challenge completed.  I am going on a quilt retreat with my guild, leaving on Thursday and not returning until Sunday evening.  The retreat center is about an hour from me, and is in a very rural area. I wanted to get my project done, posted and linked by Wednesday afternoon,  just in case the retreat center doesn't have a good internet connection. 


So again, I needed to have a small project.  I considered another potholder, because I can always use them,  and started looking around for ideas.  I remembered a block that I had seen that had geese flying in a circle. This looked like a possibility until I realized that the block finished at 12 inches square.  I resized the pattern so that it would finish at 8 inches, looked at all those tiny paper-pieced pieces and said Nope!


I am not a big fan of paper piecing.  I realize that it is great for projects that require small pieces and sharp points, but I just can't seem to get my head around working upside down and backwards!  

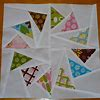
But, Project Quilting calls the weekly projects 'challenges', right?   So I challenged myself to do a small paper pieced project and (maybe) get better at it.  Using a discarded Starbucks cup sleeve as a pattern,  I made a paper pieced flying geese cup cozy.  

My very first seam had to be ripped out because I had put the wrong fabric on top and the goose fabric went the wrong way.  That didn't bode well for the project!  Instead of balling it up and throwing it in a corner, which I was sorely tempted to do, I persevered.  I got out the smallest seam ripper that I own and took out those tiny stitches.  Fortunately, the edges of the paper were intact, so I didn't need to draw a new pattern.  

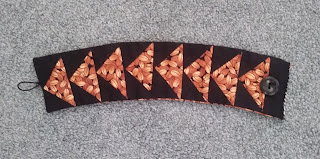
Taking a deep breath, I started again.  Once I got into it, it really wasn't so bad.  Lining up the fabric on the wrong side of the paper is a bit fiddly, but I only had to rip out a few more seams before I got it done.  

I had planned to overlap the edges slightly and stitch it across the edge to finish it.   You know what they say about best laid plans, right?   It turns out that the finished size wasn't long enough to go around my mug with any overlap.  Well, darn!!!  Starbucks cups must be narrower than the cups in my house.  

I really didn't want to start over.  After mulling over the problem, I realized that a lot of cup cozies use a button and elastic in order to let them fit around multiple sized mugs.  So I dug into my button box and found a coordinating button, and grabbed some cord elastic that was left over from making masks.  TA-DA!  It fits not only the cup that I planned to use it on, but it also wraps around and through the handle of many of the mugs in my house!


So that's a wrap for Project Quilting 13.6!  Yes, pun intended!


Wednesday, March 2, 2022

Rhythm and Repetition - PQ 13.5

The fifth challenge for Project Quilting year 13 was posted this past Sunday.  I really enjoy the creativity that PQ engenders in me, but I also bemoan the fact that some weeks I just don't have enough time to do the challenge justice.  

This is one of those busy weeks.  You would think, as a retiree, that I would have all the time in the world to devote to quilting.  Sometimes, that is the case.  This week, not so much.  

I belong to a Concert Chorale, and this weekend is our annual Classical concert.  We are singing works by Bach, Brahms, Mozart, Mendelssohn, Schubert and Dvořák - in their original languages, plus a few American folk songs, 'show tunes' and spirituals.  Needless to say, I've been putting a lot of time into learning the music and learning the languages.  We have not one, but two dress rehearsals this week, and two concerts this weekend.  

Today is Ash Wednesday, and I am the cantor for the Mass this evening.  The music minister sent out the song list on Monday,  and there are two songs that are new to me, so I had to spend the time to learn them.  

Much as I love singing, this is all cutting into the time that I have available to come up with a creative project for Rhythm and Repetition!

When I read the blog post about the challenge, I really wanted to do something Escher-esque.  I have always been fascinated by his work.  I also have an excellent book written by Jinny Beyer about tesselations that has been begging to be used. I think that it would be fairly easy to design a simple tesselation and turn it into a quilt, and I would learn a lot in the process. 

But knowing the time restraints that I am under this week, I compromised.  I made a small project so that I could complete it in fairly short order, but I used techniques and shapes that are new to me so that I could learn something new.  I've only done set-in seams once before, and I have never put binding on a quilt with 60 degree angles on the border.  So I re-learned how to do set-in seams using my  sewing machine, and I learned how to bind outside angles other than 90 degrees. I also had to figure out how to fill in the area between the star and the edge.  Hint - it involves rectangles cut on the diagonal.  

9 1/2 x 10 inches

The shape that I've never used before was the truncated diamond used to make the star.  It was cut using a ruler called a mini Hex-N-More by Julie Hermann of Jaybird Quilts.  I think that she calls it a Jewel.  It is basically a diamond with a point cut off. It could be pieced by sewing a half-hexagon to one side of an equilateral triangle, but using the ruler takes out that extra seam. 

The repetition comes in a couple of  different ways.  Obviously, the jewel shape is repeated six times around the center hexagon. But a more subtle repetition is the hexagon motif itself.  There is the one in the center, and the whole project is a hexagon, but drawing a line connecting the peaks also creates a  hexagon, as does drawing a line connecting the inside angles. 

I'm not really sure what to call the end product.  It's a little too big to be a potholder, but a little too small to be a table topper.  I guess that it could also be a big mug rug or a candle mat....Whatever it is, I'm done and I'm happy with it.

Friday, February 18, 2022

PQ 13.4 - Mining for Diamonds

This week's challenge presented so many possibilities, so many ideas!   

A few year ago, I made a Lemoyne Star baby quilt out of part of a layer cake, and it really turned out nice.  But the more I thought about it, I realized that I had completed that one as a Project Quilting Challenge! (PQ 11.6 - Vibrant and Vivacious).  So I nixed that idea.  I didn't want to do the same thing twice! And besides, I have a big quilt in progress on my design wall right now.  All the blocks are in just the right places, and if I took them down to put up a different quilt, they'd get all mixed up, even if I labeled them.  Ask me how I know....


I considered making a mug rug, like this one that I made from a Kimberbell embroidery file.  But mug rugs seem kind of overdone, (especially by me ;->) and I was in the mood to do something different.


As I was mulling over ideas and digging through my stash, I came across a small piece of harlequin fabric that I had printed using a fabric sheet and my printer.  As an aside, I don't know about you, but I am not very fond of the fabric sheets that are sold for use in a home printer.  The ones that I have tried all seem to be very stiff.  

At the time that I printed the harlequin fabric, I had been playing around with ideas for a guild challenge for a Mardi Gras themed wall hanging.  I didn't have the time to go searching local quilt shops or order online and wait for delivery, so I bit the bullet and tried the printable fabric sheets.  As it turned out, the fabric ultimately didn't make the cut (pun intended) for the wall hanging.   I hate to waste things, so I put it in my 'someday I'll figure out what to do with it' drawer.  It had been languishing in that drawer for several years.  Since the harlequin pattern is made up of diamonds, I thought that this was the perfect time to use it.

Still going with the Mardi Gras theme (I mean, what else can you do with a fabric that is green, gold and purple diamonds?),  I decided that a mini banner to string across the fireplace would be apropos.  I cut out the letters spelling "Mardi Gras!" from the fabric sheet, then cut out green, gold and purple felt rectangles and sewed them on top of each other to make little panels.   I thought that using pinking shears for the gold would add an interesting detail to the panels.  Maybe it does, but cutting the soft, flexible felt with the pinking shears that I have was a pain in the tuchus.  Next time, I will stabilize the felt before attempting it! 

I used fusible applique and for the letters and carefully ironed each letter onto a set of rectangles. Note the word 'carefully'... on my first attempt, the iron was too hot and I almost fused the felt to the iron!  

Then I strung the little panels together on a length of purple yarn and hung it over the fireplace. 

To tell you the truth, I am not thrilled with the outcome.  The diamonds in the harlequin fabric are a little too big and the letters lose definition from a distance. I may take a black marker and go over the edges of the letters to make them stand out better, but it is finished for now. 


The last character is an exclamation point. 
 I used it to balance the two sides of the banner.

Close up, you can see the diamonds,
and the letters more clearly.


Thursday, February 3, 2022

Kitchen Influence - PQ 13.3

 After the sleepless nights that the previous Project Quilting challenge gave me, I was relieved to see this week's challenge! I immediately decided to make a potholder.  Easy, quick, and functional!  The only decision that needed to be made was what pattern I would use and what shape it would be! Square? Round? And I have a really cute pattern for an owl shaped potholder, so that was a definite option.  

Square potholders are more traditional, but those corners tend to get dipped into or dragged through the food, which means that they need to be washed often, so they wear out sooner.  Round potholders are my definite favorite for exactly that reason - no corners!

To be honest, I have made square potholders for several of the challenges because the topic or the pattern idea lent themselves to squares.  For example, for PQ 13.1, I used up some leftover half square triangles.  They wouldn't make a good circle without a whole lot of finagling, so square it was.  But I really do prefer the round ones.  

So I started down the potholder path, only to get distracted the next day when I had lunch with a friend who does a lot of crochet, but doesn't quilt.  Of course, we started talking about the various projects that we're working on.  I told her about the planned potholder, and she asked me if I had ever made any bowl shaped potholders.  I quickly realized that she meant bowl cozies. I confessed that I knew what she meant, but I've never made any.  

When I got home, I googled 'Bowl Cozy pattern' and came up with half a dozen hits right away.  I really didn't see a lot of difference between the ones that are for sale and the ones that are free.  Free is always good, so I chose a link and clicked.  

I can't believe how simple Bowl Cozies are to make, and how cute they are!  The pattern that I chose uses 2 10-inch fabric squares and 2 10-inch squares of batting and makes a cozy that fits a cereal bowl.   I found a couple of leftover squares from a layer cake and had one made in less than an hour.

All cotton batting, fabric and thread is preferred, especially if you plan to use them in the microwave.  I think that the batting that I have is all cotton, but to be safe, I'm not planning to use mine in the microwave.  I've heard too many stories of flaming potato bags...

The hardest thing that I had to do for this challenge was to get a picture of my new bowl cozy!  It's kind of hard to get a good angle, so I tried several things.  

bowl cozy with bowl

empty bowl cozy, top view


side view, showing outside fabric


I think that I am going to have to make a few more.  I just saw my daughter walking by, with a bowl of soup in my new bowl cozy....


Saturday, January 22, 2022

Silhouette - PQ 13.2

This week has been a roller-coaster of inspiration and reality!  I had some really great ideas, was inspired to try several techniques to implement those ideas, and then crashed back to reality by the fact that I do not (yet!) have the skills to use any of those techniques to make something that I would be proud of for this challenge.  

One technique is, of course, applique.  Applique is not my favorite technique, and I first thought that the only way to do a silhouette would be with applique.   I knew that I wanted to do the challenge, just wasn't sure that I wanted to do a complicated applique! So I hemmed and hawed and procrastinated for a few days. 

On Tuesday morning, I went down to the boathouse for my regular crew team workout.  Note that, since it is winter here in Pittsburgh, we don't take the boats and go out on the water, we work out on the rowing machines inside the boathouse.  The machines are set up facing the floor-to-ceiling windows, so that we can see the river (and wish that we were out on the water instead of indoors!)  So while I was working out, I was watching the water flow past the docks. I noticed the reflections of the docks in the water.  That reminded me of some photos that had been taken last fall, with the team boats backlit by the setting sun.  Or, I guess you could say, 'silhouetted' by the setting sun!  Inspiration!!

I went to the team's website and found the pictures that I was thinking of.  


Reality: Both of them are really great examples of silhouette, but way too complicated (for me) to make appliques out of them, at least not in a week.  

So I went back to hemming and hawing.  

On Wednesday morning, I attended a meeting of the Creative Quilters subgroup of the local quilting guild.  The topic was thread painting.  They mentioned several types of thread painting, one of which involves printing a picture on fabric and stitching over it.  Inspiration!!

I watched several of the videos about thread painting.  It looked easy!  I can do this!  Reality: No, I can't. That is another technique that I want to learn, and want to get good at, but my attempts this week were dismal failures.  File this under "things that I want to do someday". 

I set my sights lower.  I realized that what fascinated me about the rowing pictures was the lighting, and the setting sun.  That reminded me of some pictures that my brother had taken of seagulls at the beach, with the sun behind them.  So I did some internet surfing and found some really cool pictures of sea birds sitting on docks, piers or buoys.  Inspiration!!  

This time, reality was the winner.  I realized that I didn't have to make a super complicated applique project in order for me to be happy with it. I decided to make a simple applique project.  It finished at 10 X 14 inches and is the perfect size to add to the wall in my sewing room. 

This week's project took me a little longer than usual, but I am glad that I had all that inspiration. One of these days, I WILL do a thread painting of a rower at sunset! 

Seagull at Sunset


Friday, January 7, 2022

Here We Go Again!

A new year, a new Project Quilting season. And again, I haven't posted anything on the blog since the last Project Quilting challenge. But I'm not going to go down that path.  It is what it is.  But I do have a new project to post!  

PQ13.1 started last Sunday with the announcement of the first challenge.  It is called "All the Colors".  The question that was asked is "what can you make that is very, very colorful?"  

I was thrilled to see that topic! Lately, I have been really loving bright colors.  I don't know if it is my way of coping with the uncertainty of the pandemic, or if I'm just bored with muted shades, since I just finished a quilt using my Thimbleberries prints from the mid 2000's.   Either way, this challenge is right up my alley. 

I started thinking about what to make and was quickly overwhelmed with uncertainty.  Did I want to start a theme, and try to make each challenge related to each other?  I already have way too many mug rugs, so I really don't want to go that route. Pincushions?  Baby Quilts? Knitting project bags?  The problem with that approach is that, based on my past experience with PQ, the challenge could be anything! It could be to use up scraps or to use only one fabric. Or to make to something tiny, or make something big.  Use a specific block, use a specific color,  Make something to wear, or three dimensional, or, or...!  I didn't want to come up with a theme only to have it be shot to heck with the very next challenge!

OK, a theme is out the window and I decided to just focus on one challenge at a time.  For this first one,  I had no idea what the end result was going to be, but I had lots of ideas about what to do.  I considered using up a lot of half full spools of thread by playing with the special stitches on my sewing machine, then make something out of the resulting fabric.   Then I thought about the colorful zippers that I had purchased in bulk a few years ago, with the intention to make a bunch of small bags to sell at a craft fair. That never happened, so maybe I could sew them all together, or applique them to something?  These ideas, of course, all came about 2 o'clock in the morning when I was lying in bed trying to get back to sleep.  

The next day, I decided to go poking around in my bin of left over blocks and pieces thereof to see if there was anything inspiring there.  I discovered some 'waste triangles' that were left from a quilt that I made from brights and solid black and knew that I had my fabrics for this challenge.  The fabrics are bright, bright, bright!  I learned about waste triangles in the book 'Nickel Quilts' by Pat Speth.  It fascinated me that something could be made from such small triangles. And working with them is so much easier because they are already sewn together into half square triangles.  

I sewed the half square triangles together into flying geese, added some solid black strips to even it out and ended up with an 8 inch square.  Some of the geese are wonky, and some of the points are cut off, but since it is intended to be a potholder which will get used and dirty, I am happy with it!


So here it is - a new potholder and my entry into PQ 13.1!