Saturday, March 18, 2023

Project Quilting 14.6 - Conquer a Fear

 The challenge this week has to involve conquering something that scares you.  

"You see, to grow you must face fears. It’s the way to achieve and succeed. If you only do what’s safe and comfy, you’ll stagnate and grow soft. The way forward is always by finding and following a new path. Growth. So this week, you will confront something you fear. Your project must be about growing through exploring the unknown. 

That all sounds very philosophical and, to tell the truth, pretty vague.  I really prefer a concrete topic for the challenges.  But I guess that is why they call them 'challenges'!

I thought long and hard and realized that I really am not truly afraid of anything.  I have healthy respect for some things, especially those that could hurt me,  but I don't have any irrational fears.  But the challenge seems to be about more than actual fear.  The words worry and anxiety are also used.  So the challenge can be interpreted to mean doing something that makes you uncomfortable, and growing through that. 

When it comes to quilting, I am game for pretty much anything.  I may not enjoy some techniques, but I am willing to try them.  Foundation paper piecing, for example.  I have tried it half a dozen times,  and I honestly just don't like it.  And life is too short to do things that you don't like if there are alternatives!

So where does that leave me for this week's challenge?   One of the examples of an anxiety to be overcome that was given as an example is using curved piecing in a project.  Since I haven't done much curved piecing I started thinking that that would be a possibility for my challenge this week.  It  would definitely be a growth opportunity.

Then, as I was reading through my email on Monday, I came across the Bernina "WeAllSew" newsletter.  One of the articles was on curved piecing.  But it was the picture in the article that really caught my eye:


I'm seeing a pattern here! Curved piecing it is!

The last time I did any curved piecing, it was in a workshop where the result was SUPPOSED to be wonky.  So I decided that for this challenge, I would attempt to do a block that requires precision piecing. 

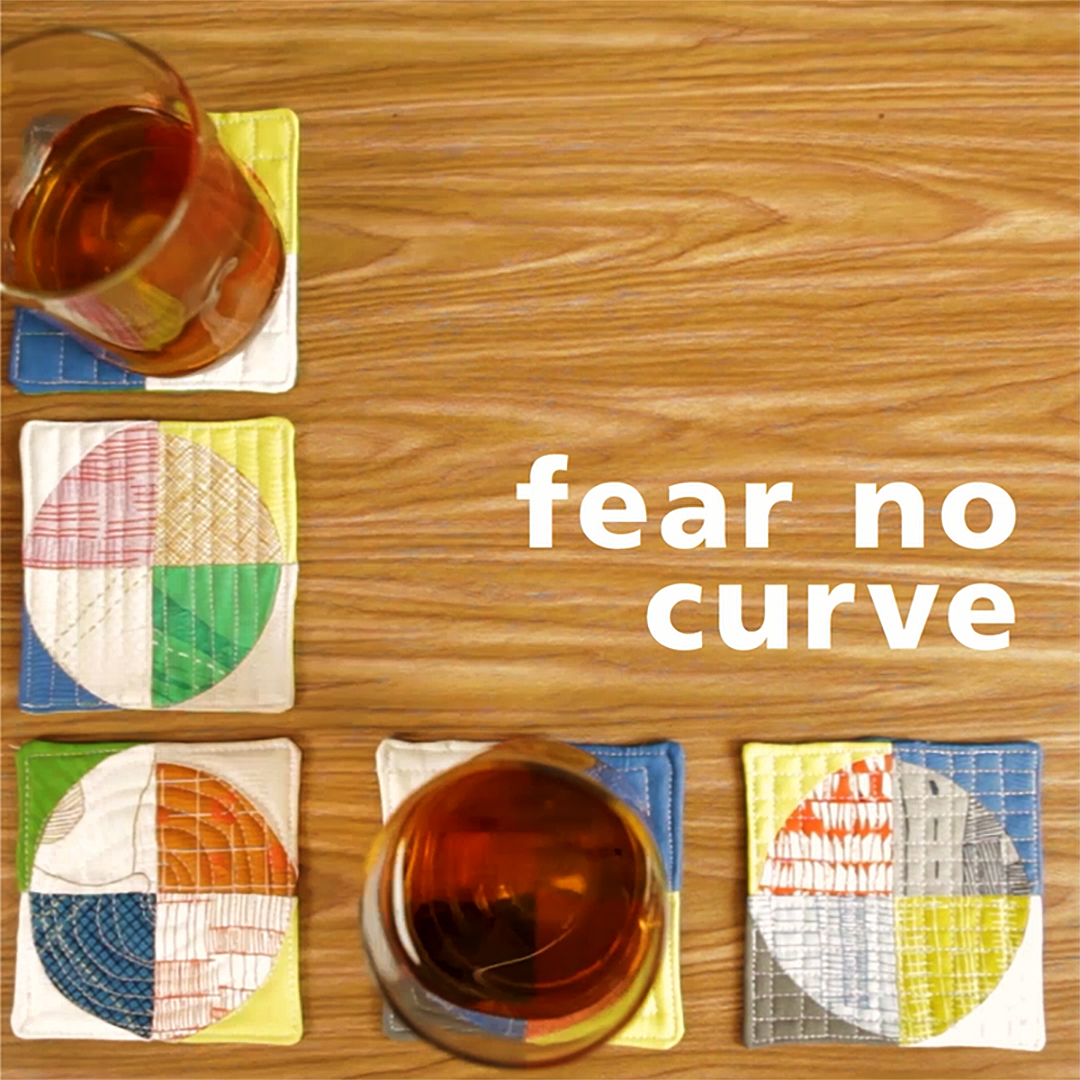
I chose the Drunkard's Path block because there is only one curve in each block, and you can make some really cool patterns with it. 

After cutting out the pieces, I remembered why I haven't done more curved piecing.  It's not the sewing, it's the cutting!  Unlike blocks with straight lines, which you can cut in almost infinite sizes with a ruler, you need a separate template for each size of Drunkard's Path block.  

I only have one ruler that allows me to cut out Drunkard's Path blocks and I didn't want to draft my own templates.  I made a couple blocks to see how they would turn out.  The test blocks ended up finishing at a really weird size - 3 3/4 inches.  If I wanted to finish my project within the week, there was no way that I could finish a baby quilt like I had originally planned.  So, plan B again! 

I decided to make another placemat for my guild's charity project.  Once I had cut out 4 sets of 4 matching blocks, I got very tired of cutting around the curves.  So I decided that whatever project I made was going to use 16 blocks!  

Sewing them together was surprisingly not too difficult.  I pinned the heck out of the first few, then just pinned the center for the rest.  Once I had them done, I started playing with the layout.  My favorite was a 4 x 4 grid because it emphasized the circle in the center.  Then I remembered that I was making a placemat.  Hmmm..... the placemats are ideally supposed to be 13 X 17 inches,  but when I laid the blocks out to make a rectangle, it was 11 3/4 inches by 18 3/4 inches,  And then I had an extra block, and I just couldn't find a layout that I liked.


OK, plan C?  I decided to use my favorite  4 x 4 grid.   The grid finishes at 15 inches square, which is too small for a table topper and too large for a potholder.... so it became a pillow cover! 
 

I found that I am not afraid of curves, I'm just not particularly fond of them.  I would do them again, given the right project. I also realized that the biggest anxiety that I experienced this week was the fear that I wouldn't finish on time!!

Project Quilting is successfully completed for another year.  Looking forward to season 15!


Sunday, March 5, 2023

When Harry met...Jane?

 Project Quilting 14.4 continued

I had decided to use the Harry’s Star block for the 4th Project Quilting Challenge this year.  The theme was “A Novel Project”, and the challenge was to use a novel that you had read as inspiration.  After many frustrating attempts, I gave up and made a potholder.  If you are interested, you can read about that fiasco a couple of posts back.  It's titled "Project Quilting 14.4 or How Harry Potter became The Last Unicorn."

Harry's Star block

Even though I was tempted to wad up the blocks and throw them in a corner,  at the end of the week I had cooled down a little.  I didn’t want to just abandon the blocks, but  also didn’t want to add to my pile of UFOs, so I continued to work on the blocks in the week between challenges.  Since the next challenge week was super busy again, I made another quick project and then got back to Harry, as I had started calling it.  

By the time I had all the blocks finished, I realized that there were 28 blocks, not 24 like I had originally calculated.  Harry was definitely a problem child!  The fat eight bundle that I used was called "Hello Jane" by Allison Harris, and it must have had more fat eights than I originally thought.  I had set aside two of the fat eights to cut up for the binding, and just made blocks out of the rest. In all the confusion and stress with trying to finish in time to use Harry as my entry for 14.4, I didn't realize that I would have more blocks than I needed if I used all the fat eights. 

After mulling it over,  I realized that having the extra blocks was a good thing. I had originally thought that I would have to cobble an extra block together out of the left overs from the other blocks in order to have my planned 40 inch square quilt.  Now that I had 28, that problem was solved. Having more blocks to play with actually worked out quite well. 

I arranged the blocks in a 5 x 5 straight set on my design wall.  During the next few days, every time I walked by, I would check to see if I liked the layout.  If two side by side blocks were too similar for my taste, or if  similar colors were too close together, I  switched blocks around, sometimes substituting one of the extras.  I wouldn't have been able to do that as well without the extras.

Once I was satisfied, I sewed the blocks together and considered what to do with the extras.  I could always throw them into my orphan block bin, but ultimately decided to use them on the back.  I pieced them into the backing in a diagonal row down the middle, then did a simple straight line diagonal quilting pattern.  The batting that I used says that you can quilt up to eight inches apart.  By starting a quilting line in every other square, the resulting diamonds are eight inches, point to point!  Harry was starting to behave! 

I cut each of the two set-aside fat eights into 4 strips, 2 1/4" x ~21" each, to use for the binding.   I sewed sets of matching strips together to make four binding pieces 2 1/4 X ~ 41".  Since Harry is 40" on each side, this was going to be tight!    I planned to use one piece on each side,  putting one color on the top and bottom and the other on the sides.  However, once I laid out the binding, I realized that there wouldn't be enough of an overlap at the corners to do the mitering.  Instead, I placed the color changes at the midpoints, and used straight seams instead of diagonal ones to join the binding strips so that the color change happens right at the centers.    It's easier to see what I mean on the back of the quilt.  If you look at the center top, you'll see that the binding changes color.  Likewise at the bottom, and on both sides.

Extra blocks set diagonally on the back 

'Harry', using Hello Jane fabrics by Allison Harris for Cluck Cluck Sew, Windham Fabrics

I've become quite fond of Harry.  Sometimes it is the 'problem children' that become the favorites, maybe because of all the trouble that they give us.  I think that Harry falls into that category!

Wednesday, March 1, 2023

Project Quilting 14.5 - Sew Not a Square

This week's challenge is to make anything you want - as long as it isn't a square!  But the rules stipulate that you can't USE any squares either! It sounds difficult at first, because let's face it, most quilt blocks are square.  But once you think about it, there are many traditional quilt patterns that don't use squares.  Grandmother's Flower Garden quilt is made with hexagons.  Thousand Pyramids?  Triangles.  Tumbling blocks?  Diamonds.  Majestic Mountains?  Well that one isn't a simple shape, it is more like a series of similar shapes.  But the point is, there are tons of possible 'not square' quilts.  But the challenge doesn't limit the entries to traditional quilts.  You could make a purse, zipper pouch or a tote bag.  A quilted vest, or a jacket.  The problem with a challenge like this is that there are so many possibilities that it is really hard to choose just one. I could literally spend a few days just trying to figure out what to make.  

But I learned my lesson with the last challenge - if I have  a lot time commitments during challenge week, then I need to do a smaller project. Even though I was planning to make a baby quilt for each challenge, I knew that this week would be an especially challenging one to get a baby quilt done.  I looked at the calendar and realized that I have major commitments on 6 of the 7 days. So a baby quilt is not going to happen this week.  

But what kind of small project could I make? There's always potholders, mug rugs, etc.  Boring, but useful. And I have made ones that are circular, hexagonal, octagonal and rectangular.   All sew not square!  Then I remembered that the guild that I belong to is doing a community service project this year, making placemats for a local service that delivers meals to the homebound. That's it!  Placemats are usually rectangular, and I was sure that I could get at least one placemat done in the little bit of time that I had between the other commitments.   

Now the problem was - what to use as the pattern?  A lot of the other guild members are using up orphan blocks and adding fabric to the sides.  The problem with that, of course, is that orphan blocks are generally square which rules them out for this challenge. 

So I started through my bookshelf, searching for inspiration.  I found the book French Braid Quilts and knew that I had my answer!  I recently did a purge of quilting books, but kept that one because a braided quilt has been on my bucket list for quite awhile.  A bonus to using them for this challenge is that making a small project with a given technique is a good way for me to decide if I like it enough to make something bigger. 

Since I am trying to use up stash, I grabbed the bin of 6 inch squares which were given to me a few years ago.  They are a real mish-mash of colors and styles, so I started sorting them by color.  I didn't want to take the time to find a sashing or border fabric for each placemat, so I decided to use some leftover strips from a black Kona fabric roll.

I cobbled together seven greys, seven black and whites, and seven red and black squares that would go well with the black. Then I cut three 2 inch strips from each 6 inch square and started sewing them together by color.  

After sewing together all 21 strips from each color grouping, I had 3 braids about 25 inches long each.  Since the braid technique makes a chevron, or arrow shape, I cut off the excess on the indented 'v" ends to make them even. Then I sewed the two cut-off pieces onto the sides of the pointy end to fill in the edges.  After squaring up the top and sides, I ended up  with rectangular braids  about 22 inches long and 7 inches wide.  


Red/Black Unfinished

I then cut each braid into two 11 x 7 inch rectangles, sewed a 2 inch wide piece of the black between them as sashing, and added 2 inch strips as a border.  This resulted in rectangles about 14 x 18 inches, which is a nice size for a placemat. 


Black/White Unfinished


Since I really only needed one placemat for this challenge, I chose the grey one to finish first.  No real reason, except the fact that I already had grey thread on my machine! The other ones will be completed before the guild collects them in April.


I did some easy stitch in the ditch quilting with just the top and the batting, then sewed on the backing envelope style.  I trimmed off the excess batting next to the stitching to reduce the bulk on the edges, turned it, then stitched all the way around 1/8 inch away from the edges to close the opening and give it a nice edge. 

French Braid Placemat

Voila! One NOT square placemat - boring, but done!